vivi@sento.com.cn
0086-13929938149

Email format error
Email cannot be empty
Email already exists
6-20 characters(letters plus numbers only)
The password is inconsistent
Email format error
Email cannot be empty
Email does not exist
6-20 characters(letters plus numbers only)
The password is inconsistent

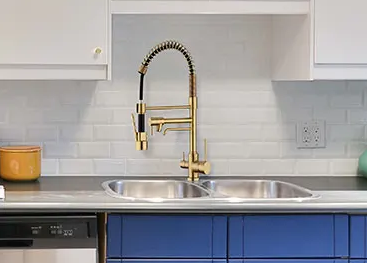
Replacing a kitchen faucet is a manageable DIY project that can enhance both the functionality and aesthetics of your kitchen. With the right tools and a clear understanding of the process, you can complete this task efficiently. This comprehensive guide will walk you through each step, ensuring a smooth and successful faucet installation.
Clear the Area Under the Sink: Remove all items stored beneath the sink to provide ample workspace and prevent any water damage to your belongings.
Turn Off Water Supply: Locate the shutoff valves under the sink and turn them clockwise to stop the water flow. If individual valves are not present, turn off the main water supply to your home. Open the faucet to release any residual water pressure.
Disconnect the Water Supply Lines: Place a bucket or pan under the supply lines to catch any remaining water. Using an adjustable wrench, loosen the nuts connecting the supply lines to the shutoff valves. Ensure you stabilize the valves with another wrench to prevent twisting the pipes.
Loosen Mounting Nuts: Under the sink, locate the mounting nuts securing the faucet to the sink or countertop. Use a basin wrench to loosen and remove these nuts. This tool is specifically designed for tight spaces and will make the process easier.
Detach the Faucet: After removing the mounting hardware, lift the old faucet out from above the sink. Clean the area to remove any old sealant, debris, or mineral buildup to ensure a smooth surface for the new faucet.
Assemble the Faucet: Follow the manufacturer's instructions to assemble the faucet components. Some faucets come pre-assembled, while others require attaching handles, spouts, or other parts.
Install the Gasket or Deck Plate: If your new faucet includes a gasket or deck plate (escutcheon), position it over the sink's mounting holes. This component covers unused holes and provides a finished look. Apply a bead of plumber's putty or silicone caulk beneath the plate to create a watertight seal.
Position the Faucet: Insert the faucet's supply lines and mounting shank(s) through the sink's mounting hole(s). Ensure the faucet is correctly oriented and sits flush on the sink or deck plate.
Secure the Faucet: From beneath the sink, thread the mounting nuts onto the faucet shank(s). Tighten them by hand initially, then use the basin wrench to secure them firmly. Avoid overtightening, which can damage the sink or faucet.
Connect Water Supply Lines: Attach the hot and cold water supply lines to the corresponding shutoff valves. Apply plumber's tape to the valve threads to ensure a tight seal. Tighten the connections with an adjustable wrench, holding the valve steady with another wrench to prevent movement.
Install Additional Components: If your faucet includes accessories like a side sprayer or soap dispenser, install them according to the manufacturer's instructions. This typically involves inserting the component into its designated hole and securing it with a mounting nut from below.
Turn On the Water Supply: Slowly open the shutoff valves by turning them counterclockwise. Check the faucet for leaks by running both hot and cold water.
Check for Leaks: While the water is running, inspect all connections under the sink for any signs of leakage. Tighten any connections as necessary.
Flush the Faucet: Remove the faucet aerator and let the water run for a few minutes to clear any debris from the lines. Reattach the aerator afterward.
Safety Precautions: Always wear safety glasses to protect your eyes from debris.
Dealing with Corrosion: If the old faucet components are corroded and difficult to remove, apply a penetrating oil to loosen them. Allow it to sit for a few minutes before attempting removal.
Consult Manufacturer's Instructions: Faucet designs can vary; always refer to the specific instructions provided with your faucet for the best results.
By following these detailed steps and precautions, you can confidently replace your kitchen faucet, enhancing both the functionality and appearance of your kitchen space.
